Tuesday, March 31, 2015

DIY Braided Dog Rope Toy

I love Pinterest. I can spend hours searching DIY home projects and recipes; I mean the pages are endless so anyone can spend countless amounts of time on there! In one of my searches I found a DIY dog toy. The concept of the dog toy is similar to those braided key chains every child knew how to make in the 90's. It seemed easy enough to make. The tutorials I saw online used pre-cut fleece fabric but I also saw one that used t-shirt strips- that one though didn't include a tutorial. I planned on making this toy. It was going to happen.
And then it didn't.
One day while I was at target I passed by a dog toy that was strikingly similar to the one I previously saw online. They were selling it for five dollars. FIVE WHOLE DOLLARS for something Stella would destroy in two days. I decided then I needed to make the toy.
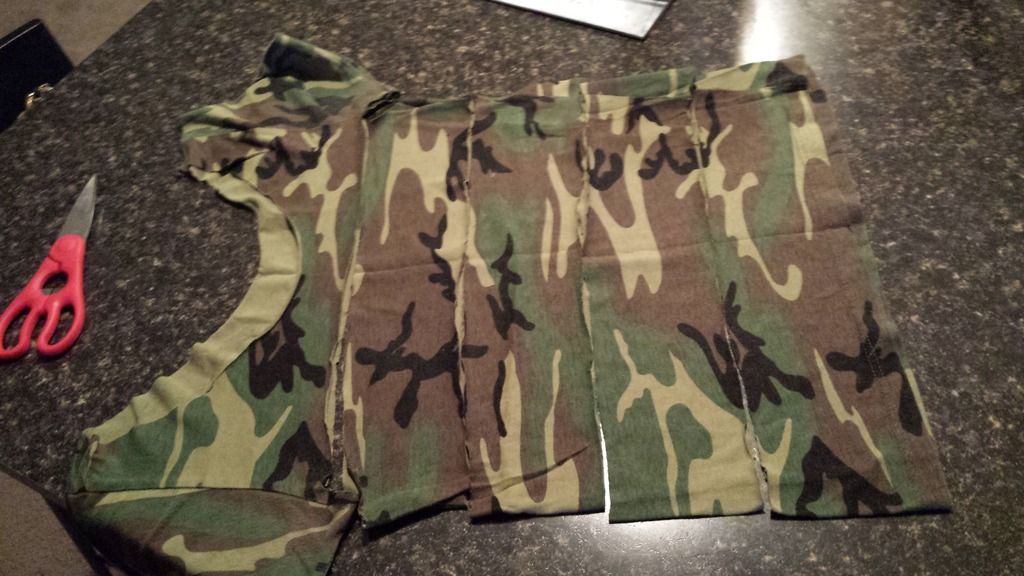
Ricky wouldn't let me use any of his shirts for the first one I made so I dug through my drawer and found one I could use to make this trial toy. Using the same method used for the key chains I made the toy.
First I cut the shirt into four pieces and then cut those pieces so they weren't connected and became just long strips.
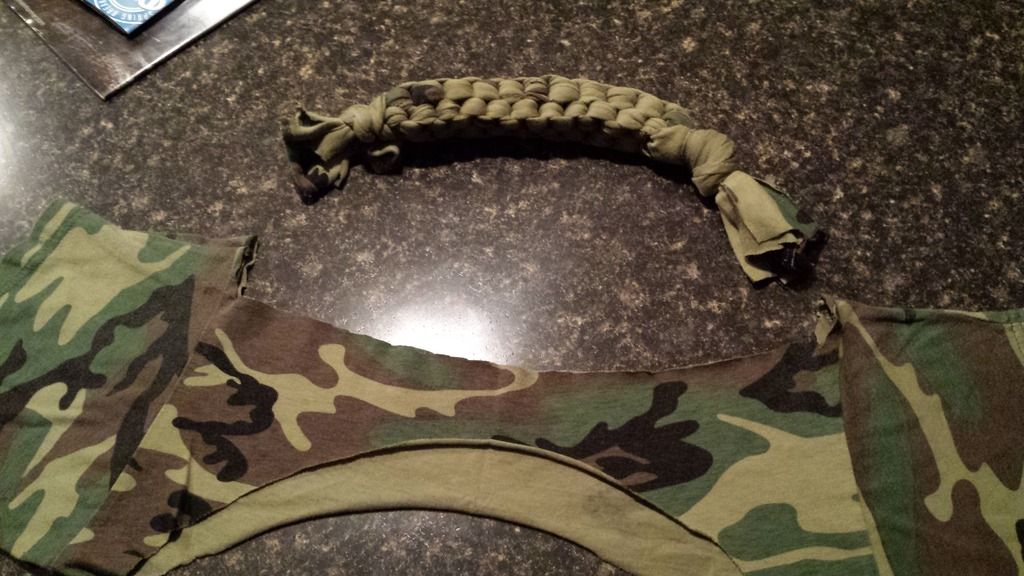
I then tied the end of the strips together tightly and began the weaving/braiding process. I followed this method:
When you pull the strips tightly together make sure you're pulling the top and bottom together and then the right and left, this ensures that it's going to be straight and all loops are tight. When I finished the weaving I tied all of pieces together in another knot.
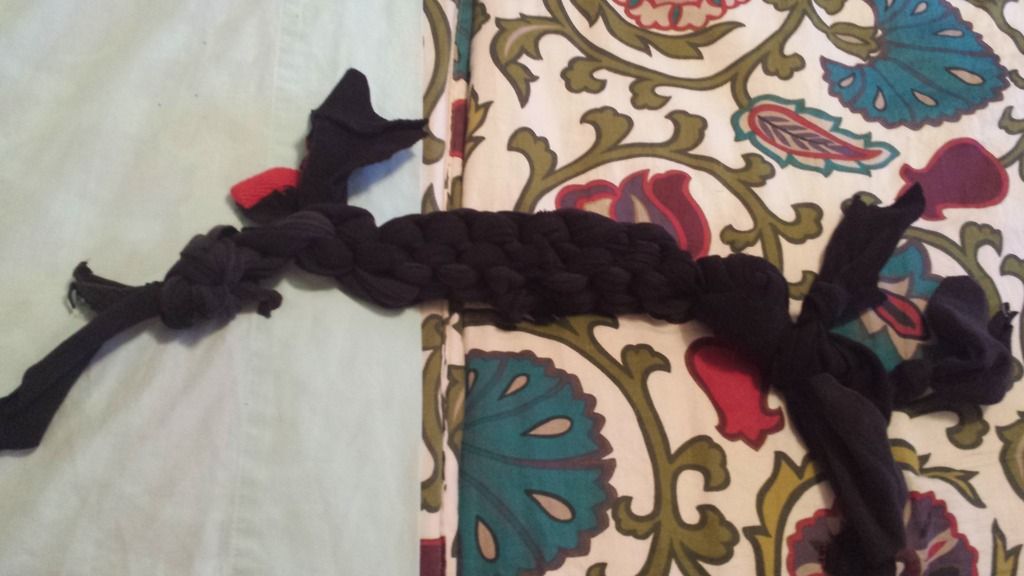
Stella absolutely loved this toy! I was thrilled considering it was easy and free! She kept it around for three or four days before it was completely destroyed. I went on to make another one this same way. Then Ricky came around to donating a couple of his shirts to the "Free toys for Stella fund." Both of these shirts happened to be black polo shirts so I decided to try to make a larger one. I cut each shirt into a single, long strip. I then cut each of those strips in half. I used the same process from there. The final product could use some work. The width was larger, almost double the size, but the length wasn't much longer. It was hard to tie the ends off, so they aren't as uniform. I think this might be because the material of the shirts, not the length or size. Nonetheless Stella loves it and free definitely beats out any store bought toy prices. 


Tuesday, March 17, 2015

Irish Car Bomb Cupcakes

This something I have been seeing everywhere for quite some time now. Whether it was my mom sending me things on Pinterest or things popping up on feeds due to my regularity posting similar items, it's been a common flavor these past few months and it's also been something I have no issue experimenting with. About a month ago I came across a recipe for Chocolate Stout Pie and thought this would be great and Ricky would love it because I would be incorporating his favorite beer! I was wrong. While it was great and I loved it, Ricky did not. He said the flavor was too rich (he apparently hates dark chocolate... I didn't think it was dark at all!) and the whipped cream tasted too much like alcohol; I made a Bailey's Irish Whipped Cream to put on top which I thought was great. We ended up giving the pie to friends who enjoyed it and only gave compliments. 
Alas here I am, with the dreams of Irish Car Bomb Cupcakes on a day none other than St. Patrick's Day. How fitting. I know exactly how I want my cupcakes to be: Guinness Draught (not Stout, we're going for a theme here) chocolate cake, cored with Jameson Irish Whiskey ganache, and topped with a Bailey's Irish Cream Cheese frosting. I gathered a few recipes found on various blogs via Pinterest and took from them what I liked. 


Guinness Draught Cake
1 C. Guinness Draught
1 C. unsalted butter
3/4 C. unsweetened cocoa powder
2 C. all-purpose flour
2 C. sugar
1-1/2 TSP. baking soda
3/4 TSP. salt
2 large eggs
2/3 C. sour cream


Preheat oven to 350°F. Line cupcake pans with liners. Set aside.
Bring beer and butter to a simmer in a heavy saucepan over medium heat. Add cocoa powder and whisk until mixture is smooth. Cool slightly.
Whisk flour, sugar, baking soda, and salt in large bowl to blend. In a large bowl beat the eggs and sour cream until combined. Add the chocolate mixture to sour cream mixture and beat just to combine. Add the flour mixture and beat briefly on low speed. Using a rubber spatula, fold batter until completely combined. Divide batter among cupcake liners, filling them half of the way. Bake for about 20 minutes or until toothpick comes out clean. Let cool in the pans for 5 minutes, then transfer to racks to cool completely.
I modified the original instructions slightly. The original recipe called for you to fill the liners 2/3 of the way, but after doing this I found that the cupcakes overflowed making them "ugly," so I resulted in filling the rest half way. The other thing I modified was the baking time. After the suggested 17 minutes the cakes were still a little wet in the center so I added on the three minutes and it worked great. One very important step here though is that you leave the cupcakes in the pan for at least five minutes. I didn't do this with the first batch, I was too anxious. When I was trimming and coring them I regretted it. Not allowing for them to cool before handling them made them crumbly and mushy. Below are pictures of the cupcakes after they've baked and had been cored. The ones on the left are the ones I allowed to cool and filled half-way. The ones on the right are the first batch that I didn't allow to cool and filled too much. 


To core the cupcakes I used a knife to cut a hole and carefully scoop out the inside. It wasn't ideal but it did the job. 

Jameson Ganache
4 oz. semi-sweet chocolate finely chopped
2 to 3 oz. milk chocolate finely chopped
3 TBSP. unsalted butter
2/3 C. heavy cream
3 TBSP. powered sugar
3 TBSP. Jameson Irish Whiskey

Heat the cream in a saucepan, not to boiling but long enough to make it hot. Place the chopped chocolates in a bowl along with the butter. Add the hot cream to the butter and chocolate and whisk together until smooth. Add the powered sugar and combine. Add the whiskey and stir to combine. Set aside to let cool. Mixture should firm up after 15 minutes. 
When I filled the cupcakes with the ganache I had to use a ziploc bag due to having misplaced my piping bags. I placed the bag into a glass and then filled it with ganache and then cut off a small corner of the bag. Below are pictures of the ganache in the bag as well as the filled cupcakes. 

Bailey's Irish Cream Cheese Frosting 
1/2 C. unsalted butter
4 C. powdered sugar
8 oz. cream cheese softened
4 TBSP. Bailey's Irish Creme

Cream together the butter and cream cheese and then gradually add the powdered sugar. Once the mixture is completely combined add in the Bailey's. This part is really only to your liking but I wouldn't add more than four tablespoons, it will taste too strong. The original recipe only called for four ounces of cream cheese but I didn't think it tasted enough like cream cheese frosting so I doubled it and am very much pleased with the results. 

I iced the cupcakes with the same ziploc bag method, this disappointed me because I planned on being fancy but considering my method it didn't turn out too bad. I garnished them with chocolate sprinkles. Ricky didn't seem to like them too much but I'm learning he's hard to please with the different types of things. He said it was again, too rich. I think they're great! Definitely worth a try. 

Sources:


Monday, March 16, 2015

Vertical Herb Garden

When cleaning up my patio I found a piece to Stella's crate which was tossed out here (why it never made it to the trash I don't know). Alas it stuck around and just as I was about to trash it I gave it a second glance- this piece of cage could in fact be used as a trellis of sorts! Then I was confronted with the everlasting issue of hanging space on my patio; I tried to hang a planter from the wall only to discover you need a special drill bit to screw into stucco, or maybe a more powerful drill than mine. Then I looked at the closet door! If there was a way to hang it from the door... I was inside getting an over-the-door hanger in mere seconds. It worked! Just place the hanger on the door and hang the grate from it and voila! I've created a trellis.
Now the task was to buy herbs, pots, and some sort of doohickey to fasten the pots in order to be hung on the trellis. I imagined three small herbs hanging on the lower portion and a vine hanging on the top half. For my inspiration for the hanging pots I was picturing something like ikea's fintorp, and if all else had failed I would have used that system; I didn't want to jump to that though because I wanted this to be 100% my own.
Next stop: Home Depot. I started in the garden center and found three herbs: basil, cilantro, and oregano (they were 5 for $10/$2 each). I then tried to search for a vine... I failed miserably. I found some ivy but it was too large for my project, I also found some other plants that I thought were vines but I wasn't too sure so I didn't purchase them just to be safe. I grabbed three black pots ($2 each) from there as well. Now when it came to fastening the pots my initial plan was to take some sort of metal and wrap it around the pots' tops and then fasten an S-hook to the pot for hanging. Not until I was at Home Depot did I realize that this was difficult. So then I moved on to picturing wrapping rope around it and the hooking the S-hook onto it, in the same fashion but this would look more appealing and match the style I have on the patio. I found some nice rope for about $3. I found a door hanger at Target that was on sale for $5 so it seemed like a steal despite the tacky yellow color... but when I got it home I noticed it didn't quite fit over the door on the patio due to the thickness so I had to switch it with the one in the bathroom... Now I have a tacky yellow hanger in the bathroom.
It wasn't until I began this project that I realized how annoying this rope was to work with... I kept trying to wrap it and make what I was picturing all along but it wasn't working correctly and after five or so failed attempts I admitted to myself it wasn't going to work at all, I needed another idea. 
I resulted with cutting a length of rope twice the circumference of the top of the pot. I looped it around the pot, tied it once and the removed it and continued to braid (or twist) the rope around itself. after I completed the circle I put it back on the pot and created a loop with one of the loose ends and tied it with a small piece of twine that was used in the rope's packaging. I tied the other end around as well for a more secure hold. I did the same thing with the other two. I then planted the plants in each pot. The plants I got were placed in biodegradable planters so you just tear off the bottom and plant it. I found that I also needed to tear off a bit from the top so that it covered more easily. But after planting and watering my project was complete! Now all I need is a vine for the top, I think I've decided on a sweet potato vine because it's cheap and it's something I can root in my own kitchen and I can never say no to that! Over all I spent about $20 on this, I don't think that's bad at all for how it turned out and I'll save money from now on on fresh herbs! 


Thursday, March 12, 2015

The love of my garden: Succulents

I can count on a single hand the amount of things I know about succulents:
They require minimal water & they love sunlight.
They propagate & do so more efficiently when left alone.
When they're unhappy with their environment they begin to grow spaced out.

That is all. Or at least that was all until I fell in love with them.

Never did I enjoy gardening. Then one day, after a stressful week I decided I needed to give myself something to keep busy. I went to Home Depot, bought a few regular houseplants and went home and planted them. Knowing of my new hobby, my mom begin telling me about this plant she has. She doesn't know what it's called, just that it can reproduce very easily. I bring a small one home and plant it. Then I learn that this plant is a succulent- a Kalanchoe Gastonis or Donkey Ears, more specifically. Quickly the internet makes me want more of these intriguing plants. So I go to the store and the next thing I know I'm taking leaves from planters in shopping plazas and trying to propagate each and every one I find. Fast forward a year and a half or so and here I am; with fourteen different varieties of succulents & cacti and two regular old houseplants (two of the original four!). Seems like a lot to cram into the small space now come to think of it... 
I have yet to master the propagation technique where you cut the stem in two, plant the rooted piece and then wait for roots to grow from the old top piece. The rooted piece always works, but the top never grows... Maybe I just failed a few times so I'm afraid to waste a succulent trying again, I don't know. 

Let's go over a few of my favorites...
Kalanchoe Luciae
This plant may just be the epitome of why I like succulents so so much. All I did was pluck a little pair of leaves from the middle of a large, clustered pot at my moms house and it grew its roots then I planted it. Unlike the mother plant, it doesn't have any red around the edges, but as far as I know that's not an issue so I'm not worried about it. In case that picture isn't a good scale, the plant on the left could easily fit on the lowest leaf on the plant on the right... One year. The past few days I've noticed a small baby plant poking out from under one of the leaves of it, I'm pretty excited to see where that goes. 

Neoregelia Fireball 
This is another plant I received from my mom. She had gotten a large cluster of them from a friend and just broke off two for me. She told me that it didn't need planted, I could hang it or sit it somewhere and it would do fine, I only needed to water it down the center. She was calling in an air plant (although it looks strikingly similar to a bromeliad). When I got home I searched for types of air plants. I exhausted all of my resources and came up with nothing. So I ended up installing an app on my phone where you take a picture of the plant and an expert responds with the name. My picture was returned as "Neoregelia 'Fireball' of the Bromeliad family." This surprised me seeing that while it is very similar in looks to a bromeliad it is very different in how it grows. I was pleased in knowing what exactly it was but I still had another question- "how does it grow?" So I waited. A few weeks passed and I noticed the little stem sprouting out from the side. I was so joyed to see the growth! In the past two weeks the stem has doubled in size.

Echeveria Cante
I think this one is my favorite of all only because after so much stress it's finally doing well. When I bought this succulent it was on the clearance rack; dying and unwanted. I brought it home, broke off the bottom spaced out leaves and planted it. The leaves withered and didn't propagate (my first attempt) and the plant still grew lanky and spaced out. So I unearthed it and repeated the process minus the attempt at propagation. Nothing. Still happened. Then I resorted to a new planter and bought the one in the pictures above. That worked! It grew happily in this planter and then I found a leaf hiding on the ground that had fallen off and grew a tiny little plant all on its own (this is the only succulent I have had issues with that with). So I took the baby pant and placed it in the planter where it began to slowly root itself. Then Stella happened. One day I go out to the porch and notice that my dog has uprooted my most temper-mental succulent. I was devastated. I knew that was the end. I knew it was dead. Done. The plant and its only "child." Alas I saved it but I lost tons of leaves in the process (the ones pictured in the planter and then some). After I finished potting it I tossed the leaves here and there on the porch, testing out lighting and moisture to see what worked best, not hoping for much except for the main plant to survive. And survive it did. Let me add that under that soil the stem of the plant is about a foot long from all the stress this poor thing has gone through... But stress no more because not only is the plant doing well but so are the, not one, but seventeen babies that have grown from its leaves! Yes, each and every leaf laying on the soil has new growth. I've never been happier with it. 

I'll post an update when new things happen with these plants, I think the changes are exciting. 
Also, if anyone has any information on these succulents (even if you're only fixing my mistakes) I would love to hear it- so please feel free to leave a comment below!

Monday, March 9, 2015

Happy Hour at Dexter's Thorton Park

Dexter's Thorton Park
808 E Washington St.
Monday to Wednesday- 7 am to 10 pm
Thursday- 7 am to 11 pm
Friday- 7 am to 2 am
Saturday- 11 am to 2 am
Sunday- 10 am to 10 pm
Happy Hour Hours:
Monday- 3 pm to close (which I thought was phenomenal)
Tuesday to Friday- 3 pm to 7 pm

After an afternoon of wedding dress alterations with my friends, we decided to grab a small bite to eat in Thorton Park. We ended up at Dexter's in the Thorton Park district of Downtown Orlando and chose to sit outside on the patio because the weather was nice for a change. Two of my friends each had the Peach Bellini Martini, and my other friend had the Ultimate Bloody Mary. I chose to have a drink made with 44's North Mountain Shore Huckleberry vodka (Misspelled as "Ghuckleberry" in their drink menu). For food all together our table ordered the Chicken Tortilla Pie, Chicken Noodle Soup, Creme Brulee, and the Caramel deLites® Cheesecake. The specials were only on the drinks but they were good deals, all of our drinks were $2 off and they also had $10 off bottles of wine. 

I chose to drink the Huckleberry Lemonade. I didn't decide to take a picture until after I squeezed in the orange garnish but I think it still looks nice. The drink was really good, it had a berry lemonade taste which I think was how it was meant to taste. 
One friend had the Ultimate Bloody Mary, it was really flavorful and spicy (the peppery spicy not the hot) it came garnished with olives that were stuffed with a smoked cheese.
Two of my friends each had the Peach Bellini and the Creme Brulee. The Peach Bellini was a bit strong and kind of orange-y tasting rather than the Mango/Peach flavor that was advertised in the menu. One sent it back, the other suffered through it. The Creme Brulee though, they said, was really good. 
The Chicken Tortilla Pie. This is not at all what I was expecting. For starters, it was crispy. I was expecting something that was soft, like tortillas, not crispy tortilla chips. And then the flavor- it tasted more like pizza than it did any sort of Mexican entree. It was still good despite the crunchy-Italian flavor. 
The other friend ordered the Chicken Noodle Soup and chose for her second drink the Sunset Martini. The martini was good, it was sweet and drinkable, everything I would look for in a martini. The Chicken Noodle Soup was a bit different because it was made with shells, not a pasta usually used in Chicken Noodle Soup. She said the dish was good but that her "mom's is still better."
The friend who sent back her Peach Bellini ordered the Lemon Berry Martini instead. The drink was a little tart but with the sugared rim it was good. I didn't think the drink was too tart without it. 
Caramel deLites Cheesecake. Two of us ordered the cheesecake for desert. I originally ordered the Strawberry Cheesecake but then our waiter returned and told us that they no longer had that cheesecake it had been replaced with this one. I was a little disappointed to hear that (strawberry and chocolate are on two different ends of the flavor spectrum) but I ordered it anyway. It was really good, the Caramel deLites cookies were used as the crust for the cake. I thought the chocolate drizzle was a little strong and syrupy tasting for the cake, kind of over-whelming. 

Overall I think Dexter's was a good choice. They're a nice environment with a wide variety of food to choose from. I also don't think their menu is too pricey, I spent $30 with tip included for the drink, entree and dessert. I wouldn't make a long drive to go there but if you're in the area, it's something I would recommend. 4 out of 5 stars. 

Thursday, March 5, 2015

Owning a Pit Bull

I've owned animals all my life, anything from red-earred sliders to ponies. Never have I been criticized for the type of animal I own. Growing up in the country, I guess it doesn't matter to people whether you have a poodle or a doberman; they're all the same there. Living in the city, it's a tad different.
Meet Stella
(I probably could have chosen a less vulnerable picture, but it serves its purpose.)

Twice I have taken Stella to the dog park. Only Twice. Both times I've left with the same feelings. Ashamed of people's feelings towards my dog. Stella is a puppy. She plays as puppies do: frantically, wildly, and without any reserve. She's also a growler; not in a mean way, in a "vocal puppy" way. When she runs up into a group of labs and collies and starts to play, all is fine until she growls. Then the owners freak out, labeling her as a "mean dog" and pulling away their dogs, all looking with distaste at the "troublemaker." If a "nicer breed" were to do the same thing no one would think twice, but because Stella is a pit bull people automatically judge her for her looks. I don't understand how you can't see through the breed and see her for what she is: a playful puppy.
Before I owned her I was never an advocate for any breed, I didn't see the issues as anything that was too pressing- now I realize I was wrong. When I'm walking my dog people shouldn't veer to the other side of the sidewalk (sometimes even in the grass!) especially not when I'm already making sure she isn't near you. Children are afraid of her because of what their parents have taught them. This isn't okay. Any dog, any size or breed, has it in them to be mean. It's in how they're raised, not their bloodlines. I rescued my dog from the streets, I gave her a better life. She is part of my family and I'll be dammed if I allow for people to continue looking at her in this way.